Remove product photo backgrounds with Claude
Every product is cut out, centered and sized the same for your shop grid, and Claude names the photos it is unsure about instead of hiding them.
I run a small furniture shop on WooCommerce. Suppliers send product photos taken wherever the chair happened to be: a white studio, a living room by a window, in front of a navy wall. Put six of those in one category and the shop looks like six different shops.
Cutting each one out by hand, then placing it on a clean square so it lines up with the rest, took me about 20 minutes a photo. Now I attach the photos to one Claude chat with one prompt, and it takes about 2 minutes a photo, including my check at the end.
On six free stock photos, from an easy armchair on white to a cane chair in a sunlit room, Claude returned a zip of twelve files in 6 minutes 7 seconds: a transparent PNG and a white JPG of each product, all 1200 by 1200, all the same height, centered.
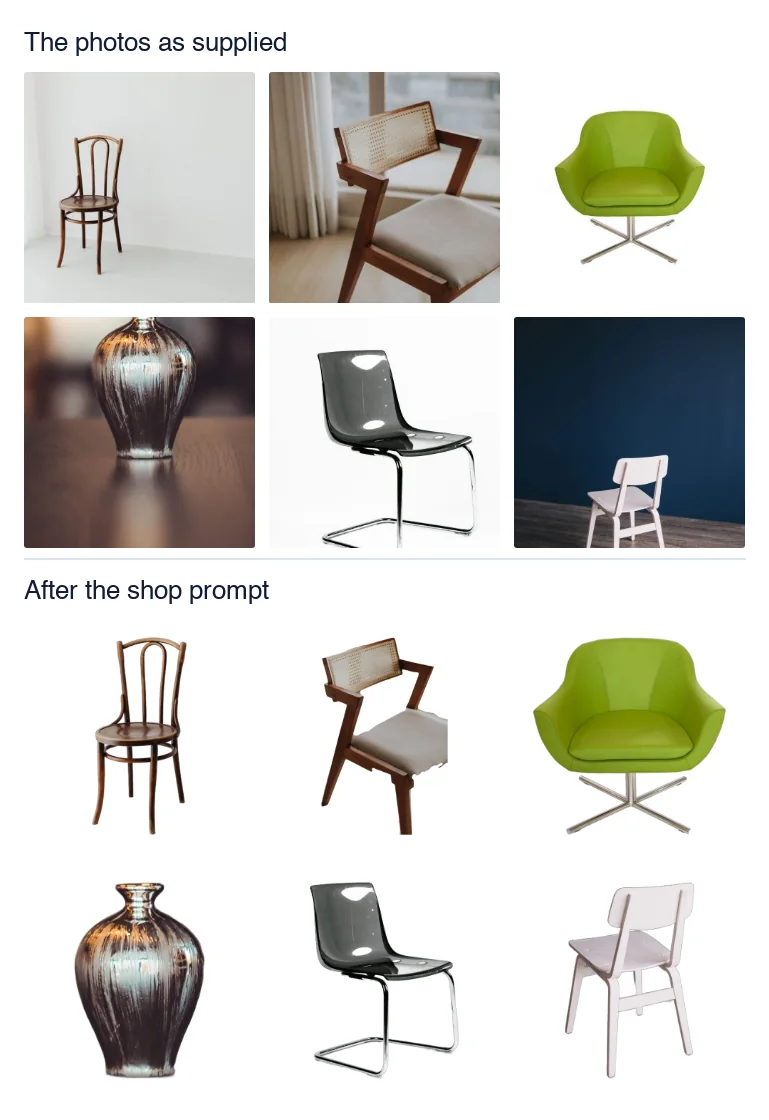
This finding is free. It shows the prompt, what Claude does behind it, where it went wrong on the hard photos, and how the files go into WooCommerce.
Why removing backgrounds from product photos takes so long by hand
Cutting out a green armchair on a white wall is quick in any tool. The time goes on everything around it: the thin chair legs, the gaps in a bentwood back, a white chair against a white floor. Then each cutout has to be trimmed, placed on a square canvas at the same size as the others, and exported twice, once transparent and once on white.
Do it for a batch of twenty and it is an afternoon, and the sizes still drift from photo to photo.
What Claude actually does with a photo you attach
Claude does not paint a new picture. With code execution switched on in claude.ai, it writes and runs a program in a small cloud computer: it installs an open-source background-removal model, runs every photo through it, and then looks at its own results on a colored background to find the mistakes.
When the model got a photo wrong, Claude went back and fixed that photo by another method, and told me which ones it was still not sure about. Your original photos are not changed; you download new files.
Why “remove the background” is not enough for a shop
The obvious prompt works better than I expected. “Remove the background from these product photos and make it transparent” gave clean cutouts of all six, with the gaps in a chair back see-through and the chrome legs intact.
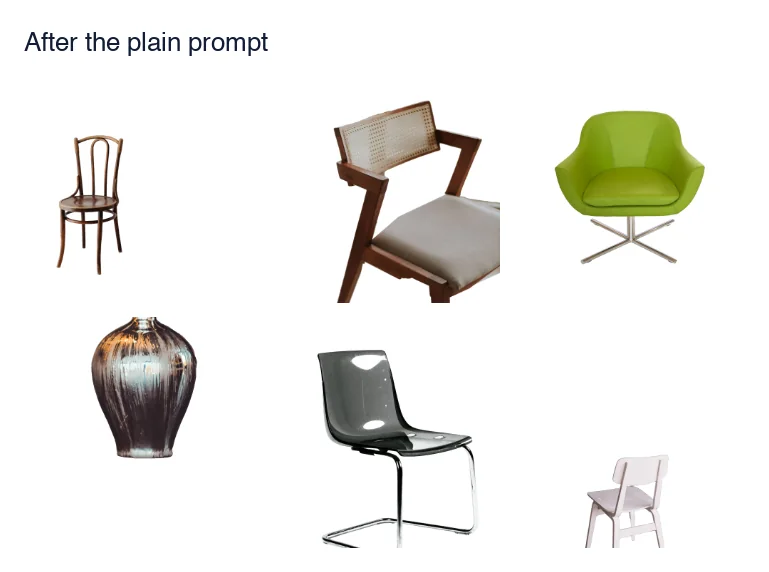
It still was not usable in the shop. Every file kept the size of its original photo, so the product filled between 12% and 55% of the image. WooCommerce crops thumbnails to a square from the center, which cut the top off a vase and left a small chair stranded in a corner.
The fix is one prompt that says what a shop needs: the canvas, the size of the product on it, both file types, and a check before you get the files.
Quick start
For when you just want a batch of photos cut out and ready for the shop.
- Switch on code execution. In claude.ai, open Settings, Capabilities, and turn on Cloud code execution and file creation and Allow network egress. “Package managers only” is enough.
- Start a new chat and attach the photos. Six at a time is what I tested.
- Paste the shop prompt below. It asks for the square, the size, both file types and a report.
- Wait. Six photos took just over six minutes. You can watch it work.
- Read the report before you download. It names the photos it is not sure about and any product the original photo cut off.
- Download the zip. A transparent PNG and a white JPG for each product.
- Set them as product images in WooCommerce. The PNG, unless your theme needs a solid background.
- Reshoot what it flagged as cut off. No cutout can add the missing part.
The video skips the six minutes of work: it cuts from sending the prompt to the finished chat from the test run, then sets one of the files as a product image on a demo WooCommerce shop.
Switching on code execution
Removing a background is not something Claude does by looking at a picture. It does it by running code, so claude.ai has to be allowed to run code and to download the tool it needs.
- Open Settings, then Capabilities.
- Turn on Cloud code execution and file creation. This is what lets Claude run programs and hand you files.
- Turn on Allow network egress. Leave the domain allowlist on Package managers only. That was enough for Claude to install the background-removal tool and download its model.
Good to know
I did not test this with network access switched off. Claude would then have to cut the photos out without the model, and the results on the hard photos would likely be worse.
The prompt, and why each line is there
Step 1: What the plain prompt gets you
Remove the background from these product photos and make it transparent.This works, and that surprised me. All six came back as transparent PNGs, with clean edges, see-through gaps in the bentwood chair’s back, and no white halo. It took about 4 minutes 45 seconds.
The problem is the frame. Each file kept the size and shape of the original photo, so the product sat wherever the photographer had put it. In the shop:
Step 2: The shop prompt
These are product photos for my WooCommerce shop. For each one:

1. Remove the background and make it transparent.
2. Trim to the product, then center it on a 1200 x 1200 square canvas, so the product fills about 85% of the width or height, whichever is larger.
3. Save it as a transparent PNG, and save a second copy on pure white (#FFFFFF) as a JPG.
4. Name the files after the product in lowercase with dashes, for example green-armchair.png.

Before you give me the files, check each one on a colored background. Tell me which photos you are not sure about and why, and tell me if a product is cut off by the edge of the original photo. Put all the files in one zip.- “Trim to the product, then center it” is the line that fixes the grid. Every product came back exactly 1,020 pixels tall on a 1,200 canvas.
- “1200 x 1200 square” matches WooCommerce’s default square thumbnail, so nothing gets cropped. Change it if your theme uses another shape.
- “A second copy on pure white” is for anywhere a transparent PNG is not accepted. It is also a much smaller file: 70 to 150 KB against 320 to 810 KB for the PNGs.
- “Name the files after the product” saves renaming twelve files. Claude guesses the names from the pictures, so check them.
- “Check each one on a colored background” is what catches a missing seat or leftover floor. On white, a white leftover is invisible.
- “Tell me if a product is cut off” makes it say so plainly instead of handing you a chair with a straight edge where its seat should be.
Tip
“Whichever is larger” was read as the height for all six, even the armchair, which is almost as wide as it is tall. That keeps a row of chairs level. For wide products such as sofas, say “fill 85% of the width” instead.
What came back from six photos
The six test photos were free Pexels shots picked to get harder as they go. Claude’s report named every problem I found myself, and nothing I did not find.
- Green armchair on white. Clean. Claude said it was confident.
- Bentwood chair in a white room. Clean, including the gaps between the thin rods of the back. Confident.
- Smoked acrylic chair. The plastic is see-through, and the white studio behind it showed through. Claude made the shell solid and said so: on a white page it looks like the original, on a dark page like grey plastic.
- White chair in front of a navy wall. Clean cutout. It warned that the white copy has almost no contrast for a white chair.
- Glass vase on a blurred table. Clean, but the vase still reflects the room it was photographed in, and its edges are a little soft because the photo is.
- Cane chair in a sunlit room. The hard one. The beige seat is the same color as the floor, and the model removed it with the background. Claude tried other models: one missed the seat as well, and the larger ones ran out of memory in its sandbox. Then it rebuilt the seat by outlining each part of the chair by hand. It said the seat edge was “slightly wavy”, and that the photo cuts the chair off: “No editing can fix this, so I’d reshoot it if you can.”
It also noticed that my files were numbered 01, 02 and then 04 to 07, and asked whether a photo 03 had gone missing. It had: I had left it out.
Watch out
Look at the photos it flags before they go on the shop. A cutout it rebuilt by hand, like the cane chair, can be good enough at thumbnail size and still show a ragged edge on the product page, where the image is shown large.
Which photos cut out cleanly
From six photos, the pattern was plain:
- Easy: a product on a plain background of a different color, in sharp focus, whole in the frame.
- Fine with a warning: see-through or reflective products (acrylic, glass, chrome), and white products on white.
- Hard: a product the same color as something behind it, a busy room, and anything the photo cuts off. The first two Claude can repair, slowly. The last one only a new photo fixes.
If a supplier photo is in the hard group and the product matters, ask for a new photo before asking Claude. Prompt 6 in the file below asks Claude to sort a batch into these groups before it edits anything.
Adding the photos to WooCommerce
- Open Products and edit the product.
- Click Set product image in the Product image box, upload the PNG, and press Set product image.
- Click Add product gallery images for the other angles of the same product.
- Press Update.
- Check the shop page and the product page. The first shows the square thumbnail, the second the large image, where edges show most.
If products still look cropped, check the thumbnail setting: Appearance, Customize, WooCommerce, Product Images, Thumbnail cropping. The default, 1:1, crops to a square, which is why the prompt asks for one.
Tip
If your theme shows products on a grey or colored tile, use the transparent PNG and the tile shows through. On a plain white theme the white JPG looks the same and loads faster.
Ready-made prompts
Ten prompts in the same shape: attach the photos first, then paste one. The first is the tested shop prompt; the rest change one thing about it, from a light-grey copy for white products to fixing a part that went missing.
# Prompts for product photos in Claude

Attach the photos to the chat first, then paste one of these. Change the parts
in CAPITALS. Prompt 1 is the one tested in this finding; the others change one
thing about it, so read what Claude reports back as carefully.

## Main photos

1. Shop-ready squares

   These are product photos for my WooCommerce shop. For each one:

   1. Remove the background and make it transparent.
   2. Trim to the product, then center it on a 1200 x 1200 square canvas, so
      the product fills about 85% of the width or height, whichever is larger.
   3. Save it as a transparent PNG, and save a second copy on pure white
      (#FFFFFF) as a JPG.
   4. Name the files after the product in lowercase with dashes, for example
      green-armchair.png.

   Before you give me the files, check each one on a colored background. Tell
   me which photos you are not sure about and why, and tell me if a product is
   cut off by the edge of the original photo. Put all the files in one zip.

2. A different canvas

   Same as before, but on a WIDTH x HEIGHT canvas, with the product standing on
   the same baseline in every image, about 5% above the bottom edge.

3. White products

   These products are white or very light. Cut them out as transparent PNGs on
   a 1200 x 1200 square, and make the second copy on light grey (#F2F2F2)
   instead of white, so the edges stay visible.

4. A soft shadow

   Cut these out as before, then add one soft, even shadow under each product,
   the same on every photo, so they do not look like they float. Keep a copy
   without the shadow too.

5. Files named after my SKUs

   Name the files from this list, in the order I attached the photos:
   SKU-1, SKU-2, SKU-3. Tell me if the number of photos and names do not
   match.

## Before a batch

6. Which photos will cut out cleanly

   Do not edit anything yet. Look at these photos and tell me, for each one,
   whether the background will come off cleanly, and why not if it will not:
   similar colors, glass or shiny surfaces, a product cut off by the frame.

7. Match my existing photos

   The first image is a product photo already in my shop. Cut out the other
   photos and place them so the product is the same size and position as in
   the first one, on the same canvas size.

## Fixing one photo

8. A part is missing

   In PHOTO NAME, the PART (for example "the beige seat cushion") was removed
   with the background. It is part of the product. Put it back and show me the
   result on a colored background before you save it.

9. Background left behind

   In PHOTO NAME, some of the background is still there: WHERE (for example
   "the floor between the back legs"). Remove it and show me the result on a
   colored background.

10. Smaller files

    Make a WebP copy of each transparent PNG at quality 85, and tell me the
    file size of each PNG, JPG and WebP.
When it breaks
No files come back, only a description of the photos. Code execution is off, so Claude has nothing to make files with. Switch on Cloud code execution and file creation in Settings, Capabilities, and start a new chat.
It says it cannot install or download something. Network egress is off. Switch on Allow network egress; “Package managers only” is enough.
Part of the product is missing. The model took it for background, usually because the colors are close. Name the photo and the part, as in prompt 8, and ask to see it on a colored background before it saves.
Some background is still there. Say where, as in prompt 9. Floor between chair legs is the usual one.
“Killed” in the steps, or it says a model ran out of memory. Its cloud computer has 4 GB of memory, and the larger models do not fit. Claude falls back to another method on its own. It is not an error you need to fix.
Every product is a different size in the shop. The prompt did not ask for a square canvas and a fill. Use the shop prompt, not the plain one.
Your originals stay as they were
Nothing here changes a photo you attached. Claude works on copies in its own cloud computer and hands you new files; your originals stay on your computer, and nothing reaches your shop until you upload it.
Good to know
It is a heavy chat. Six photos ran for six minutes of work, so on a plan with usage limits send batches of about six rather than fifty at once.
Good to know
Screens move. If a menu or a button here no longer matches what you see, email info@findings.lt and this finding gets updated.